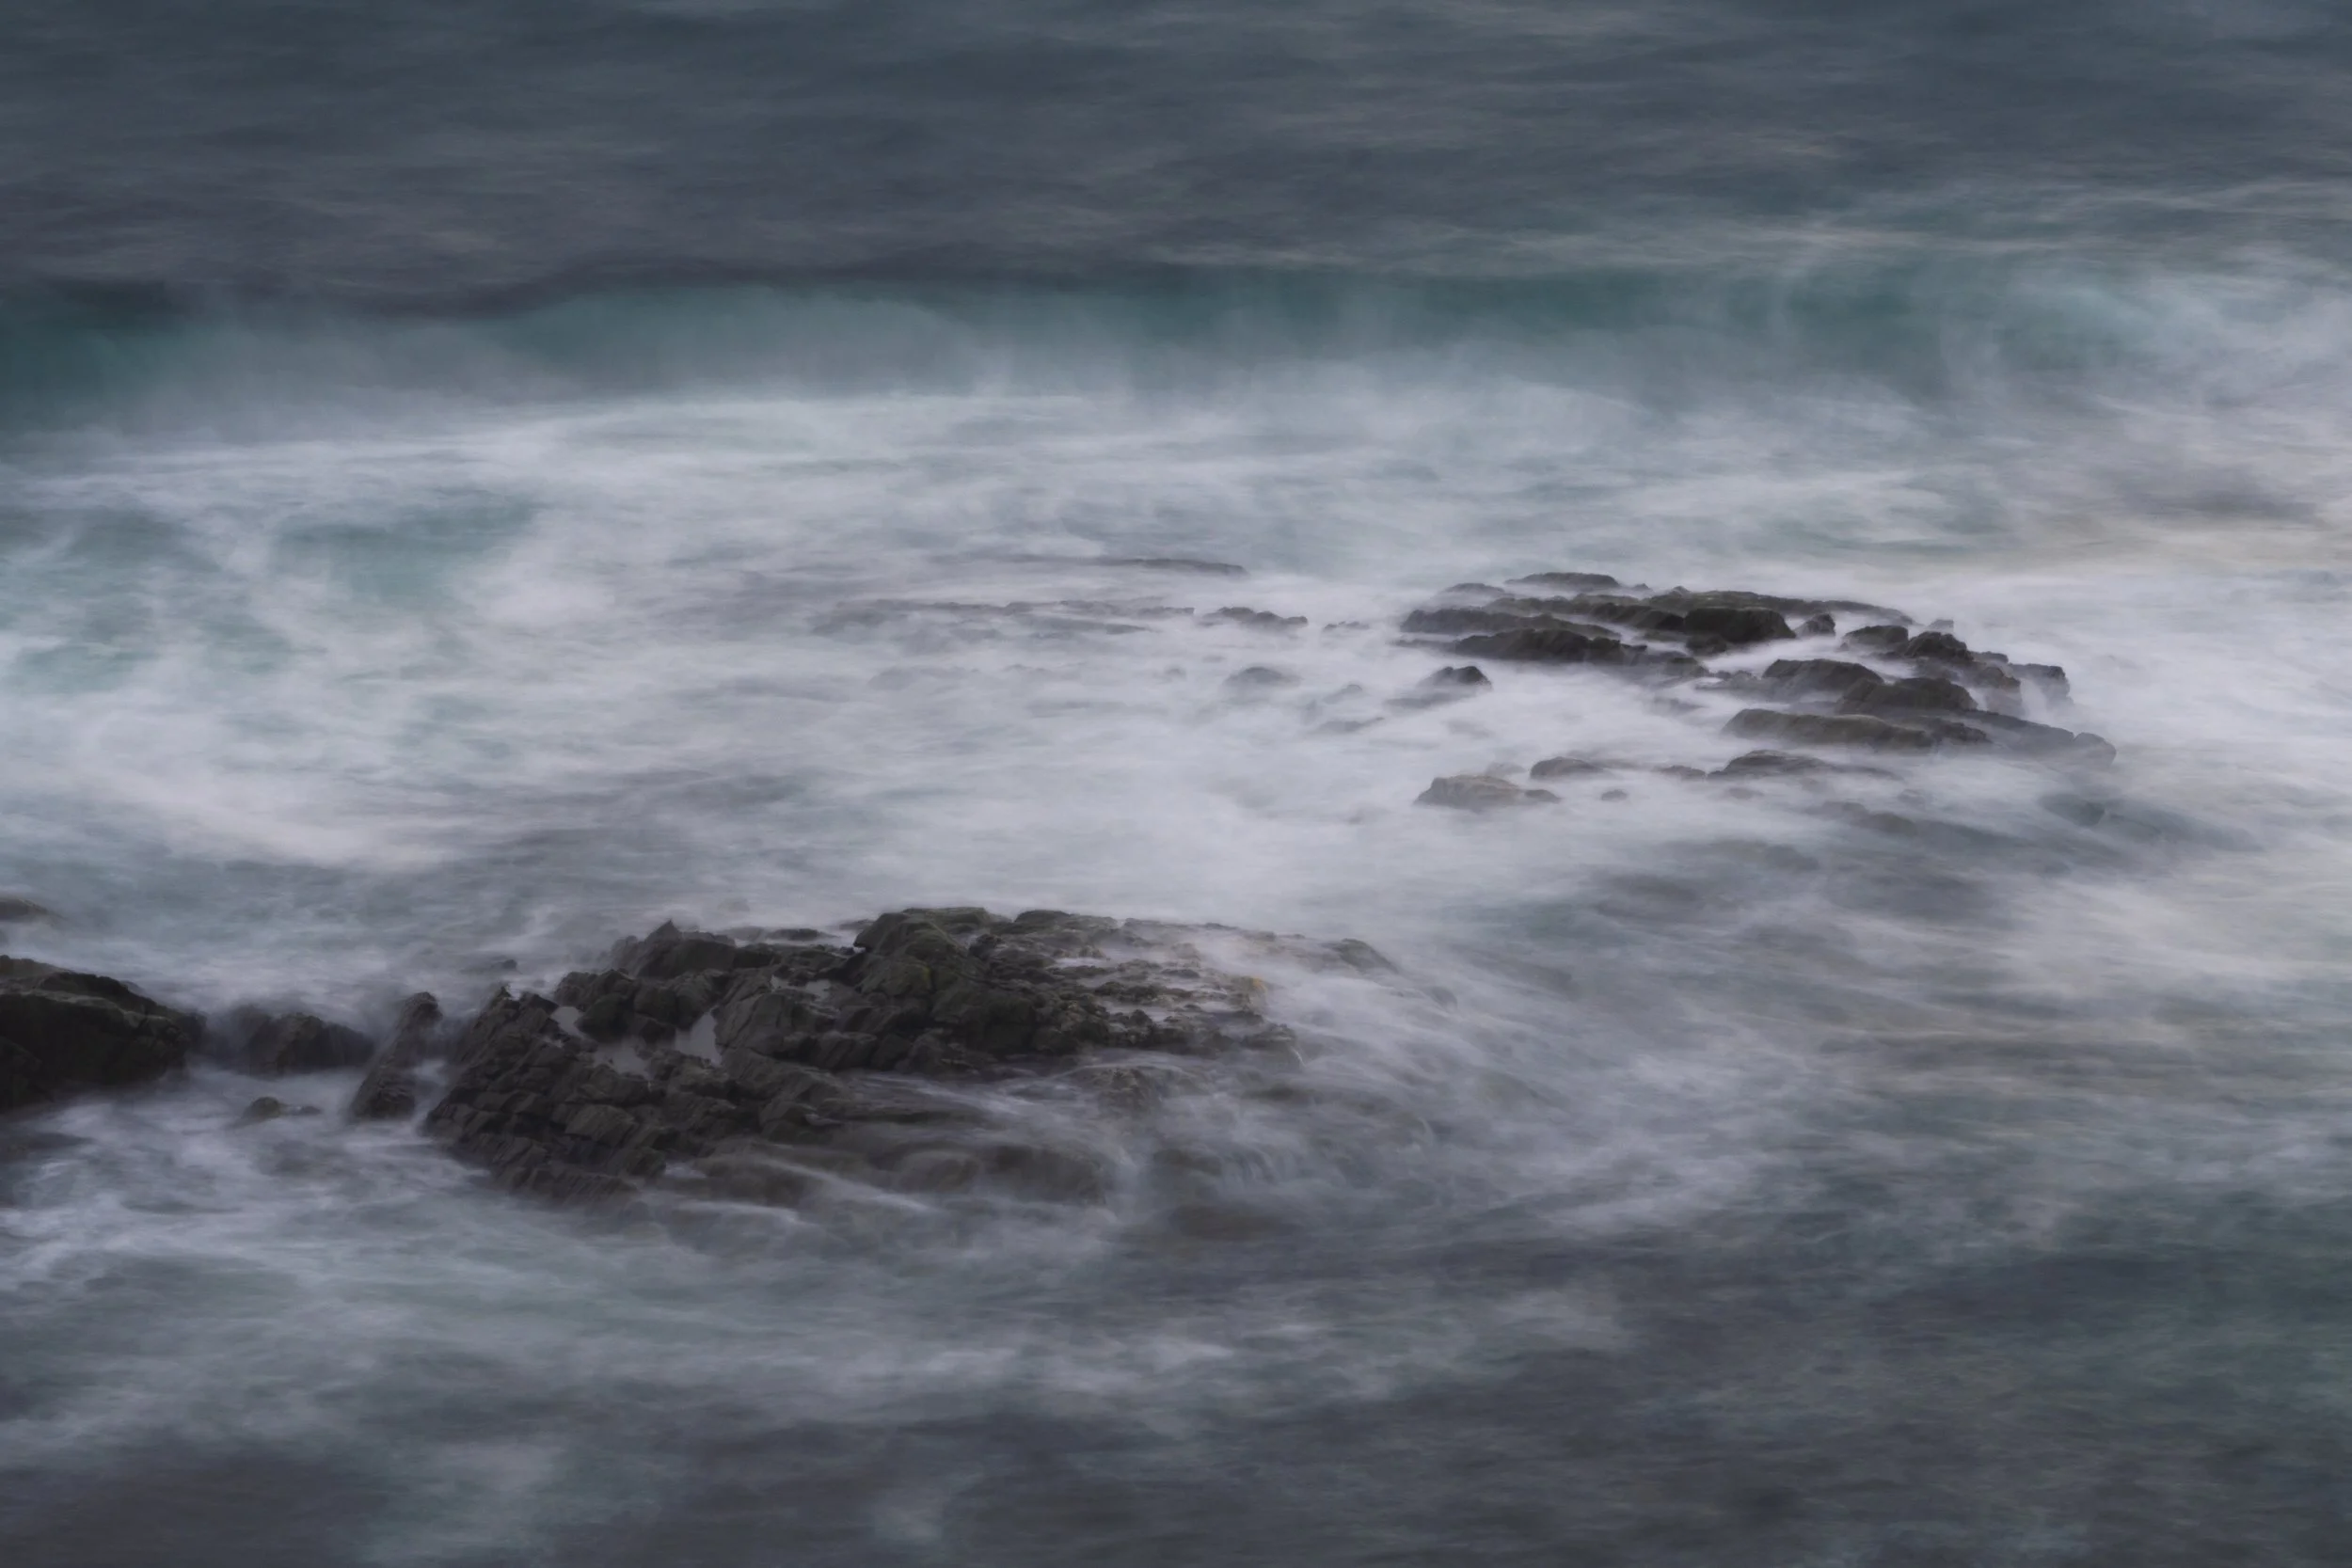
Sandøya, Norway. NiSi System V7, Nano IR Neutral Density Filter IR ND1000 (3.0) – 10 Stop. Photo: Bjørn Joachimsen.
With optical camera filters from NiSi attached to your lens, you can create a bit of extra magic in your images, whether you are photographing landscapes or urban environments. With a filter set in your camera bag, you can achieve long exposure times, eliminate reflections, and control exposure, and more.
In today's digital photography world, some may wonder if optical filters are still necessary. To some extent, it is relevant to ask this question. Nevertheless, it remains the case that camera technology and post-production can only partially replace the effects you can achieve by using filters.
What are optical filters?
Optical filters are square or round pieces of glass that you attach to the front of the lens to achieve effects in the image that would not be possible without these filters. This differs from digital “filters,” which are something added to the image later during post-production. An optical filter is attached by screwing it into the front of the lens. These filters are round, and you need filters with the same diameter as the front of your lenses. One variation is round filters with a magnetic mount. If you want a more extensive filter system, there are solutions with filter holders, square filters, and adapter rings.
Different types of filters for various purposes
We can, somewhat simplistically, distinguish between five different types of filters for photography and video.
Protection filter
These are designed solely to protect the front element of the lens from damage and have no visible impact on the capture.
UV filter
A UV filter reduces the amount of ultraviolet radiation hitting the sensor or film in the camera. This has practically no effect on digital recordings, but with film in the camera, it can provide a more natural colour rendition in certain situations.
Polarising filter (CPL filter):
A polarising filter can be used to remove reflections from shiny, non-metallic surfaces completely or partially. This type of filter has a wide range of applications and can be beneficial in landscapes, macro, product photography, and much more. The effect can be adjusted by rotating the filter, depending on how much reflection one wants to remove from the subject.
Neutral Density filters:
These filters (known in Norwegian as grey filters) are often used in still photography to achieve longer exposure times than would be possible without a filter. In video recording, they are often used to allow shooting with a wide aperture even in bright light. ND filters come in various strengths, and you choose the filter that suits a given situation based on the desired result.
Here is an overview of the most common types of ND filters:
ND2: The exposure is doubled (one stop) compared to shooting without a filter.
ND4: The exposure increases by two stops compared to shooting without a filter.
ND8: The exposure increases by three stops compared to shooting without a filter.
ND64: The exposure increases by six stops compared to shooting without a filter.
ND1000: The exposure increases by ten stops compared to shooting without a filter.
A couple of examples of exposure adjustments
If the correct exposure is achieved with 1/30 second without a filter, then 1/4 second will give the same exposure with an ND8 filter attached to the lens. If the correct exposure is achieved with 1/30 second without a filter, then 30 seconds will give the same exposure with an ND1000 filter attached to the lens.

To the left: Without filter. Exposure time: 1.3 sec. To the right: NiSi System V7, Nano IR ND1000, TrueColor CPL and GND8 (0.9) Soft. Exposure time: 240 sec. Photo: Bjørn Joachimsen.
Graduated ND filters
These are a type of filter that is often used to darken parts of the image, most commonly the sky in a landscape photograph. A graduated ND filter (also called a GND filter) is dark on one half and completely transparent on the other. It has a gradual transition between these two halves, allowing for natural results. Such filters are only available in filter systems that use a filter holder and square filters.
Natural Night filter (Light Pollution Filter)
This is a type of filter designed for night photography, including auroras and other astrophotography. The purpose of the filter is to eliminate artificial light (so-called "light pollution") that often causes unnatural colours in the areas affected by such light in the subject.

Nordlys over Reine i Lofoten. NiSi System V7, NiSi Natural Night Filter, NiSi Nano Medium GND8 (0.9). Foto: Bjørn Joachimsen.
Black Mist filter
This type of filter is primarily used in video recordings, but can equally be used for still images. The filter reduces highlights and slightly lowers the contrast. Additionally, it creates a soft rendering and softens unevenness in the skin during portrait photography.
Many possibilities
Over the years, I have repeatedly heard that optical filters are primarily suited for flowing water with long exposure times. However, there is so much more that you can use them for, and—as often is the case—your own imagination and ability to experiment create limitations. That said, I also find optical filters very exciting to use for images with flowing water.

Dubrovnik. Croatia. NiSi 150mm filter holder for Tamron 15-30mm f/2.8. NiSi Filter 150x150mm Nano Multicoated IR ND64 (1.8). Exposure: 180 seconds. Photo: Bjørn Joachimsen.
Usingfilters in urban environments
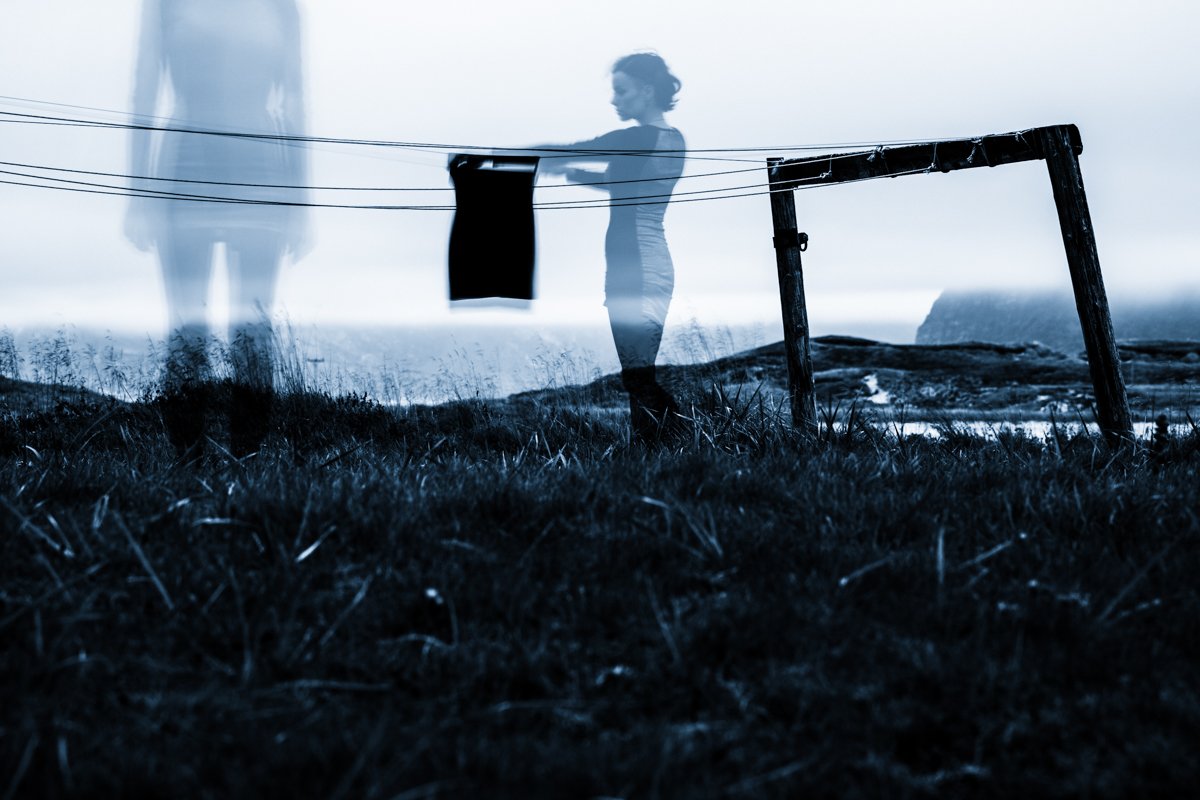
One of the techniques you can employ with optical filters—specifically Neutral Density filters (known as grey filters in Norwegian)—is to use long exposure times in urban environments. With a dark ND filter, you can achieve long enough exposure times that people walking in the streets "disappear" from the image. In practice, you should be prepared to use a tripod in such situations. Often, the most exciting lighting occurs after sunset, allowing you to achieve exposures of several minutes without having to use the darkest variants of ND filters. I often use an ND64 filter when photographing after sunset, which allows me to achieve exposure times of 3 minutes or longer. If there are many people where you are photographing, it is essential that everyone moves during the exposure time if you want them to "disappear" from the image. Additionally, you will need an exposure time of between 3 and 5 minutes to achieve this effect.

Rakke in Vestfold, Norway,. NiSi System V7, NiSi Filter Nano IR ND64 (1.8), NiSi Nano Medium GND ND8 (0.9). Exposure time: 60 seconds. Photo: Bjørn Joachimsen.
Out to sea
I often photograph along the coast of Norway and regularly find great use for my filter systems. In many cases, I also use multiple filters at the same time, making a filter system with a filter holder, square filters, and adapter rings the setup that provides me with the most options.
With the help of ND filters, I can achieve slightly longer shutter speeds than I would without them. At other times, I use very long exposure times. The filters and exposure times I use depend on the situation, lighting conditions, and the result I want to achieve. A long exposure time can range anywhere from 1/15 second to 15 minutes.

Ullsfjord in Troms. NiSi System V7, NiSi Filter Nano IR ND8 (0.9) – 3 stops, NiSi Nano Medium GND Grad 0.9. Exposure time: 0.5 seconds. Photo: Bjørn Joachimsen.
How to achieve correct exposure?
With filters and long exposure times, it can sometimes be a bit time-consuming to determine which shutter speed will provide the desired exposure. A good tip is to take an exposure without the filter first. I use either aperture priority mode (Av or A) or manual exposure program (M). Since the aim is to achieve a long exposure time, it’s a good idea to start with a low ISO and a small aperture. Automatic ISO will not work under any circumstances with ND filters if long exposure times are desired.
With most modern cameras, the light meter will function even with fairly dark ND filters in front of the lens, thus avoiding the need to calculate which exposure time will give the desired result. You can safely use aperture priority mode, and the camera will adjust the shutter speed correctly. However, many cameras have a limitation of a maximum of 30 seconds for shutter speed in automatic or manual exposure programs. If this applies to your camera, you will need to work with the camera in B (bulb) mode when you want to expose for longer than the limitation your camera has. In such situations, a remote control with a timer function can be useful, giving you precise control over long exposure times.
In manual exposure mode (M), it is easiest to determine the correct exposure by taking a shot without the filter and then using NiSi’s exposure calculator to calculate the exposure time with the ND filter. This calculator is available as an app for Android and iOS and can be used in conjunction with the NiSi Bluetooth Remote Control for even easier and quicker work.

Vestvågøy in Lofoten, Norway. To the left: NiSi System V7, NiSi Filter Nano IR ND64 (1.8) – 6 stops, TrueColor CPL and GND8 (0.9 Medium). To the right: Without filter. Photo: Bjørn Joachimsen.
Filter combinations
In many situations, particularly in landscape photography, there is a need to use multiple filters simultaneously. I often end up using both ND, GND, and TrueColor CPL filters for a shot. In such situations, the NiSi System V7 performs best, as it allows for the combination of all these filter types without requiring compromises or limitations.
In the example above, this was the case. I used the TrueColor CPL filter to reduce reflections on the rocks and water in the foreground, making the colours in the foreground more prominent. Additionally, I used an ND filter to smooth out the small ripples in the water in the foreground, as well as the waves in the mid-ground. To prevent the sky and sea from being too bright compared to the foreground, I also mounted a GND 0.9 (ND8) Soft. This ensured that the upper part of the image was exposed 3 stops darker than the rest of the image area.
A NiSi V7 filter holder has 3 slots for inserting square or rectangular filters. Additionally, a TrueColor CPL filter can be mounted inside the holder's mounting ring, behind the filter holder itself. This allows you to rotate the CPL filter independently of the holder and the filter mounted in it. This is a very practical solution that works well in use.

Vestvågøy in Lofoten. NiSi System V7 100mm, NiSi Nano Medium GND8 (0.9) - 3 stops, with the dark half at the top of the image. Photo: Bjørn Joachimsen.
Aurora photography
It may come as a surprise to many that filters can be useful in connection with aurora photography. I have successfully used both GND filters and Natural Night filters when photographing the northern lights. I often look for opportunities to capture reflections of the aurora in calm water or on smooth ice, as this can create interesting effects. To achieve a better balance between the aurora and its reflection, I commonly use a GND filter to reduce the exposure of the sky.
When photographing the northern lights with buildings in the foreground, the opposite can occur—the foreground can become too bright compared to the sky. In such cases, it can also be useful to have a GND filter mounted the opposite way—placing the dark half at the bottom. Additionally, using a NiSi Natural Night filter can help neutralise artificial light in the image, achieving a more appealing and less orange colour.

NiSi System V7 100mm. NiSi Nano Medium GND8 (0.9) medium, with the dark half at the lower part of the image, as well as the NiSi Natural Night filter. Photo: Bjørn Joachimsen.
Useful accessories for long exposures
If you are working with long shutter speeds outdoors, it is essential to have a stable tripod. Many desire a tripod that is affordable, stable, lightweight, and compact. In reality, no such tripod exists. To have a tripod that provides sharp images even in windy conditions or when placed on soft ground, you will need to invest in both price, weight, and size.
Another useful accessory for most cameras when making long exposures is a remote control with a timer. This allows you to set the camera's exposure program to B (bulb) and control the shutter speed using the timer function of the remote control. You can use, for example, the NiSi Bluetooth Remote Control or the Hähnel Captur Pro Timer Kit.
Creative control
Although the effects of optical filters can to some extent be replicated by camera functions and techniques in post-production, using filters provides a level of control over the shot that is unique. With the proper use of filters, you can achieve a more optimal capture and a less complicated and time-consuming process when editing the material. In some contexts, you can also achieve effects that cannot be fully replicated in other ways. Thus, optical filter systems still have a justified place in the equipment of many photographers.
Different filter systems
As a photographer or videographer, you are currently faced with the choice between two types of solutions for filter systems:
Circular filters with a magnetic attachment, such as the NiSi JetMag Pro
Square or rectangular filters that are mounted in a filter holder, such as the NiSi System V7.
The filters provided for these systems are largely the same, but if you wish to use graduated ND filters (GND), the choice should be the System V7, as the magnetic systems do not currently offer the option for such filters.

NiSi JetMag Pro Landscape Kit.
NiSi JetMag Pro
This is a system launched in 2024 that utilizes a magnetic attachment for the filters. It allows for very quick and easy filter changes, and there is a wide range of filters available to choose from. JetMag Pro includes two different series, with the difference being the size of the filters and adapter rings. If you do not have lenses with a front diameter larger than 82mm threads, the standard JetMag Pro solution will be suitable for you. You can use adapter rings ranging from 67mm to 82mm. If you have lenses with 86mm or 95mm front threads, you can use the JetMag Pro 95 system, which was launched in 2025.
The filters mount in front of the adapter ring after it has been screwed onto the lens front. It is easy to stack multiple filters if needed, just make sure that vignetting does not occur. To prevent the magnetic filters from falling off during use, the JetMag Pro is designed so that you can twist the filter to lock it in place.
JetMag Pro and JetMag Pro 95 are offered in kits tailored for various applications, and significant savings can be made by purchasing one of these kits compared to buying filters and adapter rings individually. You can choose from the following kits:
JetMag Pro Landscape Kit
JetMag Pro Cinema Kit
JetMag Pro Filmmaker Kit
JetMag Pro Black Mist Kit
JetMag Pro Night Kit
Common to these kits is that they include a set of adapter rings from 67mm to 82mm, metal caps, as well as a sturdy and compact case for storing everything. A 62mm adapter ring can be added to the kit as a separate item.

Færder National Park, Norway.. NiSi JetMag Pro FSND64 (1.8/6-Stop). Exposure: 240 seconds. Photo: Bjørn Joachimsen.
The JetMag Pro filters feature very thin frames that prevent vignetting, even when used with wide-angle lenses. The adapter rings are also extremely thin yet stable, as they are made from high-quality aluminum.
Some of the key features include:
Fast magnetic attachment mechanism: The filters can be easily clicked on and off thanks to the magnetic design, saving time in hectic shooting situations.
Stable locking mechanism: The patented locking mechanism keeps the filters in place, even when multiple filters are stacked in challenging environments.
Ultra-thin frames: Reduces vignetting on wide-angle lenses, ensuring sharp, clear images without edge distortion.
Colour-coded handles: Each type of filter has a colour-coded handle for easy identification and quick access to the correct filter.

NiSi System V7 100mm filter holder with TrueColor CPL.
NiSi System V7 100mm
If you want to take advantage of all the possibilities that a filter system can offer, the System V7 will be the solution for you. Like the JetMag Pro, it uses adapter rings to mount on lenses with different diameters. With System V7, you attach a filter holder to the front of the chosen adapter ring, and then place the filters into the slots of this holder. The V7 holder is designed to allow you to rotate the CPL filter independently of the other filters, which is very practical.
The filters for this system are either 100x100mm (ND filters) or 100x150mm (GND filters).
With System V7, you gain access to graduated ND filters (GND), which expands its usability. Such filters have been highly popular among landscape photographers for decades. Additionally, this system provides access to adapter rings in many more sizes than the JetMag Pro systems. Therefore, you can use the same filter system for many different lenses, except for some extreme wide-angles. Adapter rings are available in sizes ranging from 49mm to 95mm.


Just like with JetMag Pro, System V7 can also be purchased in kits tailored for various applications. Here are some of the kits you can choose from:
NiSi 100mm V7 Starter Kit
NiSi 100mm V7 Night Photography Kit
NiSi 100mm V7 Advance Kit
NiSi 100mm V7 Professional Kit
There is also a smaller and larger alternative to the 100mm V7 system. If you only have fairly small lenses, the NiSi M75 system will do the job for you. However, if you have lenses with a diameter of 95mm and above, or wide-angle lenses that do not have front threads, the NiSi 150mm system will be necessary.

Rana, Norway. NiSi System V7, NiSi Filter Nano IR ND 0.9 (ND 3-Stop). Exposure time: ⅛ second. Photo: Bjørn Joachimsen.
Bjørn Joachimsen is a photographer living in Nøtterøy, Norway. He is a Focus Nordic ambassador. Focus Nordic is a distributor for NiSi Optics.